Everything We Learned Flying With A Bicycle
Everything We Learned Flying With a Bicycle
Stew and I were suddenly faced with a flight home back in March 2020. Our trip came to an abrupt end while we were in Vietnam. With the majority of flights being cancelled it’s fair to say we learned rather quickly what we needed to do to get ourselves and our bikes from Vietnam to the UK by plane.
Here’s a complete guide on how to fly with a bicycle, including everything we wish we knew before we made our trip.
In this article
- Our top tips for flying with a bike
- Types of bike bags, their advantages and disadvantages
- What do we use: hard case, soft case or cardboard box?
- How to prepare your bike for flying
- Getting your bike on the plane
- Things to look out for when booking your flight
Our top tips for flying with a bike
These tips are essentially the tips that we didn’t see coming and wish we’d known about sooner.
Give yourself plenty of time
If you’re thinking about flying for a bike for the first time, it’s fair to say that it is actally quite overwhelming! We were certainly a bit worried about it and the circumstances of our departure from Vietnam didn’t help things. We had 24 hours to prepare our bikes for travelling by plane so we didn’t have the luxury of time.
Where you can, give yourself time.
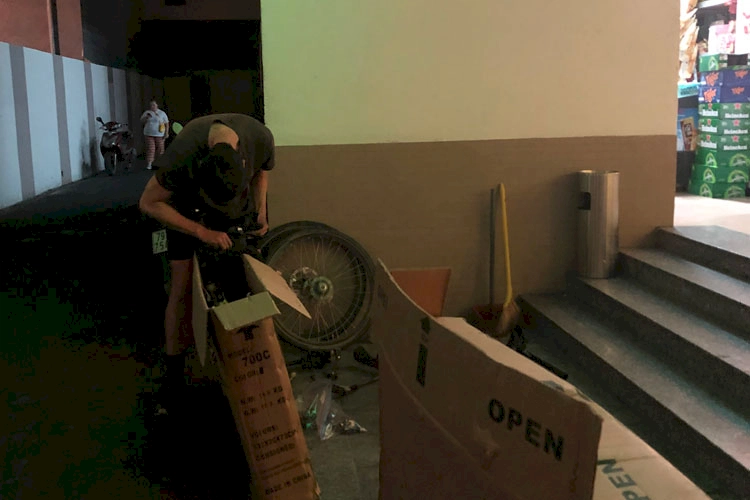
It took considerably longer to pack our bikes than we thought it would. You need to account for taking the wheels off, removing pedals, taking the seatpost out and getting the bike to actually fit in the bag or box you want to fly it out on.
If you’ve got time you can manoever things around so the bike doesn’t get damaged.
Also, if like us, and you’re using a cardboard box to fly with your bike then you need to leave some time to account for actually finding a box. This took some time for us.
Prepare to pay for a box
We needed to source two bike boxes to fly with our bikes. When you’re doing a big tour, like a cycling trip around the world, you obviously can’t carry you bike box with you.
We were in Hanoi, Vietnam, and we had to visit all the bike shops we could find. It really took a while to find a place with a bike box big enough, especially for Stew who is 6″4 and rides an XL frame.
We eventually found a place and they charged us £15.00 for each box. That’s £30 for two cardboard boxes that were otherwise going in the bin. I guess they knew we were desperate, and they were right, we were.
Check the rules of the country you’re entering
Before you pack your bike check the rules of the country you’re entering as well as airline policies. Some countries, like Austrailia will want your bike in tip-top condition and thoroughly cleaned
Try to weigh your bike before travelling
If you don’t already know the weight of your bike, try and weigh it if you can. It will help give you an idea of how much baggage fees you will be charged.
Carry your documentation with you
Personally, I would always have print outs of things like your boarding pass and any details relating to the bike. It gives me peace of mind to know that I can put my hand to whatever the airline needs.
Fly direct if you can
this one isn’t always possible, but I think, if you can a direct flight is ‘safer’ purely because you’re less likely to lose your luggage. When we flew Vietnam to the U.K. we flew via Hong Kong and everything was okay, so it’s not essential, but I think I personally would relax more with a direct flight.
Types of bike bags, their advantages & disadvantages
There are two main types of bike bags available on the market: hard cases and soft cases. Or, you can use a cardboard box like we did.
Here are the advantages and disadvantages of each option.
Hard Cases
Advantages
1. Protection – Hard cases will protect your bike from almost anything. They’re great if you’re worried about your bike being damaged in transit.
2. Easy to pack – Hard cases are often easier to pack your bike into as you don’t need to remove as many parts. You can often just take the wheels off and be good to go. Some hard cases even have allocated spaces for your bike bits.
3. No assembly required – Once you’ve packed your bike into a hard case it’s all set to go. There’s no need for any further assembly once you arrive at your destination.
4. Unlikely to break – a Hard case is less likely to break or rip compared to a cardboard box or soft case.
Disadvantages
1. They’re expensive – Hard cases can cost upwards of £300, which is a lot of money if you’re only using it once or twice.
2. They’re heavy – Hard cases are made from solid materials, so they’re quite heavy. This isn’t ideal if you’re trying to save money on baggage fees by keeping your bike as light as possible. It’s less than ideal if the bike bags sends you into the upper limits of what an airline will allow.
3. They’re difficult to store – Hard cases can be quite difficult to store when you’re not using them. This is less than ideal for an international cycle tourist.
Soft Cases
Advantages
1. They’re cheaper – In comparison to hard cases, soft cases are cheap, but you’re still looking at around £150 minimum.
2. They’re lightweight – Soft cases are made from lighter materials so weigh less than a hardcover.
3. They’re easier to store – Soft cases fold up smaller than hard cases. Still not ideal for international, long cycle tours, but can be alright if you’re doing a loop.
Disadvantages
1. They offer less protection – Soft cases don’t offer as much protection as hard cases.
2. They’re more difficult to pack – As soft cases don’t have a solid structure it can be tricky to get your bike into them. You often need to remove more parts, which can be a pain.
Cardboard Bike Boxes
Advantages
1. They’re cheap – In Vietnam we had to pay £15/box, but generally you can often find bike boxes for free from your local bike shop.
2. They’re easy to pack – Packing a bike into a cardboard box is fairly easy, but expect to get stressed over it! In some ways it helps not to have allocated spaces so you can get any bike into any box as long as it’s the right size.
3. No assembly required – If you’re lucky you’ll get a bike box that is all in one piece. That’s what we managed to get. Getting it home wasn’t the easiest, but we managed.
4. They’re lightweight – Cardboard bike boxes are made from…well, cardboard, so they’re quite light. This is good if you’re trying to save money on baggage fees by keeping your bike as light as possible.
Disadvantages
1. They offer less protection – Cardboard offers less protection than a hard or soft case. However, if you’re careful with your packing you can offer enough protection.
2. They break easily – Cardboard is not the most durable material and bike boxes can break quite easily. We were lucky and our box arrived in one piece, but it was a bit battered.
What do we use: hard case, soft case or cardboard box?
We used a cardboard box and I must admit, our bikes did get a little damaged in transit, but we take the responsibly for that wholeheartedly; we just didn’t pack it smart enough. If you’re thinking of flying with a bike in a cardboard box definitely read the below!

How to prepare your bike for flying
Alright, below details all of the things we did, plus some of the things we wish we did! Whatever you do, don’t skip this section, especially if you’re flying your bike in a cardboard box.
Deflate Tyres
This one is fairly obvious, but make sure you let all of the air out of your tyres before packing them up. You don’t want your tyres exploding in transit! Don’t think I need to say anymore on that one!
Remove pedals and other items
Definitely remove the pedals. Trying to push the bike intact into the box is just going to rip it, so air on the side of caution and remove as much as you can. If possible (and if weight allows), wrap the pedals in something soft or use bubble wrap. Secure the pedals to your frame with cable ties.
The same applies to other items that can be removed (and need to be removed). For example: lights, computers, bottle cages (we left our bottle cages on). We had to also remove the front wheel, handlebars, mudguard etc. but our boxes were a bit small.
Wrap up the Cassette
The cassette was the one thing that damaged our bikes.
We removed both wheels and stacked the cassette down the side of the bike frame. During transit the cassette rubbed against the frame.
After 13,000 miles our bikes were immaculate minus the damn cosmetic damage from the cassette! We were pretty gutted to be honest, but oh well, live and learn!
At least now you won’t make the mistake that we did.
Cable tie everything into one bundle
Cable tie everything (wheels, frame, pedals, chain etc) into one bundle. This way if your box does break everything will stay together and hopefully won’t get damaged.
Mark the saddle height
Stew always marks our saddle height anyway but when you fly definitely do this! When you get to the other end and have to reassemble the bike you’ll be glad you did.
Clean it
Ideally you will clean the bike wherever you are travelling, but this might be especially important for certain countries like Australia where they ask for items to be immaculate.
Use padding
If weight and space will allow: use padding. It can’t hurt to give the bike a bit of cushion. We did shove some clothes in with ours.
Label the box
We made sure to label the box with our name, contact details and address. If the worst happened and the bike got lost they’d be able to get it back to you.
Pack Your Bike With Care
Earlier on I said to give yourself time if you could. Packing a bike into a box is easy enough, but oh my is it frustrating. You’re going to have that thing in and out the box, packed and repacked in different positions trying not to stretch and rip the cardboard.
Getting your bike on the plane
Getting your bike on the plane is as simple as putting items in the hold. Follow good check-in actions like arriving at the airport in plenty of time to check-in and drop off your luggage.
Remember you will have to pay for your bike as an extra item of luggage.
It’s always a bit nervy, flying with a bike, but remember you’ve done all you can to make this experience a seamless one.
View this post on Instagram
This Instagram post was our final post of the trip. It shares some of what we went through taking our flight with our bikes from Vietnam to England, via Hong Kong.
Things to look out for when booking your flight
Most airlines, if not all, will charge an additional fee to carry a bike. So you need to do your due diligence and check the prices and policies of the airlines amongst other things.
Here are some key things to look out for:
- Check the weight and size restrictions for luggage
- When you’re packing your bike into a box it will obviously be classed as oversized — or most likely — sports luggage. As such, there are usually weight and size restrictions that you need to adhere to. These restrictions will differ from airline to airline so make sure you check before booking.
- Check the fees associated with flying with a bike
- Check for any special instructions on how to pack the bike
For more cycle touring guides read:
- How to Get Into Cycle Touring as a Beginner
- How to Handle Stray Dogs When Cycling
- How to Quit Your Job and Travel for a Year
Post written by: Zoe Ashbridge
Comments
Ask a question or join the discussion below.
No comments have been made yet, be the first!